TAB H - Friendly Fire Incident Descriptions
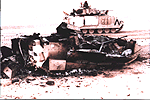
Figure 24. Bradley Passes Destroyed Iraqi BMP-1 AFV
The "100 hour" Desert Storm ground campaign illustrated the ferocity and high operational tempo of modern warfare. Almost one million coalition combatants and over ten thousand armored vehicles engaged in intense and sustained combat operations around the clock and in all weather. Unlike previous conflicts where the front lines remained relatively fixed, Operation Desert Storm was characterized by a dynamic, often confused battlefield where individual combat vehicle crews and units, caught up in the rapid advance punctuated by pitched skirmishes and battles, sometimes lacked "situational awareness" regarding the precise whereabouts of surrounding enemy and friendly forces.
On the modern battlefield, success tends to favor the side that can see, engage, and neutralize the enemy first. US combat vehicles enjoyed important technological advantages over Iraq’s older, mostly Russian-designed armored vehicles. Superior sighting and sensor equipment almost invariably allowed US crewmen to see and engage the Iraqis first, especially during night combat or in bad weather. US cannon systems were stabilized, so they could fire accurately while on the move. They could select, load, and fire munitions far more rapidly than their Iraqi counterparts. Finally, the use of DU rounds allowed US tanks to engage the enemy with unprecedented range and effect. While Iraqi Republican Guard T-72s—Saddam’s most formidable armor threat—boasted a 125mm cannon with a maximum effective range of 1,800 meters, US M1A1 tanks routinely scored kills at twice that distance.[140] In addition, Iraqi tanks, anti-tank guided missiles, and infantry anti-tank weapons failed to penetrate the DU armor of any of the 594 Heavy Armor M1A1s that saw action in the Gulf War, even when firing from well within their supposed "lethal" engagement parameters and scoring direct hits.[141] The result was one of the most lopsided victories in modern military history—Iraq lost in excess of 4,000 armored vehicles to US air and ground fire, while US ground forces sustained fewer than 25 combat vehicle losses (with most damaged not destroyed) from hostile fire.

Figure 25. Bradley Patrol at Dusk
Tragically, "fog of war" situations caused by the rapid advance of American forces, coupled with the use of long-range, highly lethal weapons, led to a number of friendly fire incidents in which US combat vehicles, usually M1A1 tanks, fired on fellow US combat vehicles or units. At least eight friendly fire incidents involving DU munitions fired from M1A1s occurred during the Gulf War. These incidents resulted in the contamination of six M1 or M1A1 tanks, and 15 Bradley Fighting Vehicles. Another M1A1 was hit by a large shaped-charge round, believed to be a Hellfire anti-armor missile fired from an Apache helicopter, that ignited an on-board fire. This incident is described separately in the "Tank Fires" section. The major contributing factors in all of these incidents were darkness or low visibility from heavy rains, sandstorms, etc.. In most cases, owing to battlefield confusion, the soldiers manning the targeted vehicles initially believed that the Iraqis had fired the shots that penetrated their armor. A team of battle damage assessment experts was later able to ascertain which vehicles had been engaged by Abrams tanks, since the DU round leaves a distinctive radioactive trace on the entrance and exit holes. In most cases, after-action investigations and word-of-mouth reporting among and between the units involved resulted in the affected soldiers learning that they had been victims of friendly fire. Not all of these soldiers, however, were aware of the potential health effects associated with internalized DU. Accordingly, the investigation of friendly fire incidents is being accompanied by a comprehensive effort to identify, locate, and contact all surviving soldiers who were in or on vehicles at the time they were penetrated by DU rounds.
a. The 4th Squadron of the 7th Cavalry Regiment: Between 3 and 5:30 PM, February 26, 1991
Three Bradleys configured as Cavalry Fighting Vehicles (CFVs) were struck by DU rounds fired from Abrams tanks between 3:00 and 5:30 PM on February 26. The vehicles were hit during a large-scale tank battle. Visibility was poor due to dusk and blowing sand and smoke.[142] The vehicles were either mistaken for Iraqi vehicles or caught in the crossfire of a "nonlinear" (shifting and confused) battlefield.[143]
At the time of the incident, the 3rd Armored Division was attacking to the east with the 1st Brigade on the right and the 2nd Brigade on the left, with the 3rd Brigade following. The 4-7th Cavalry was protecting the Division’s right flank. Alpha troop of the 4-7th Cavalry was screening on line with the lead elements of the 1st Brigade. Alpha troop was arrayed with the 3rd platoon on line, followed by the 2nd platoon on line 500 meters behind. Upon contact with six enemy tanks and 18 light armored vehicles (BMPs), the 2nd platoon split and sent three of its Bradleys to the right and left flanks of the 3rd platoon. The Bradleys of Alpha Troop were exchanging direct fire with the enemy tanks and BMPs at ranges from about 100 to 800 meters. The Bradleys employed their 25mm HEI (High Explosive Incendiary) and tungsten armor piercing (AP) munitions, as well as Tube-launched, Optically-tracked, Wire-guided (TOW) antitank missile systems. The following information is known about each Bradley (Cavalry Fighting Vehicle configurations) hit by DU rounds during the confused engagement.[144]
A Troop 4-7th Cavalry, Bradley (Bumper # A-24): A-24 was the first Bradley to be hit, struck by a 120mm DU sabot round fired from an Abrams tank.[145] At sundown, with wind-blown sand further reducing visibility, 3rd Platoon, to which A-24 was assigned, came over a rise in the terrain and saw a "target rich environment" with enemy ground troops and BMP armored fighting vehicles. A-24 engaged the enemy with TOW missiles and fire from their 25mm turret gun. When the gun jammed, the "track" commander attempted to pull the Bradley out of the fight to fix the gun and reload the top-mounted TOW missile launcher. As the loader was half-in, half-out of the vehicle attempting to reload the TOW, the vehicle was struck by a single DU sabot round and almost immediately was engulfed in flames. The DU sabot round entered the left front center of the turret section and exited the right rear center. The gunner was killed, and the vehicle commander received a serious leg wound. Two of the three remaining crewmen had minor injuries (flash burns); the third was unwounded, but reentered the Bradley to remove personal equipment and to recover the body of the gunner. Another Bradley, A-26, came to their aid, but apparently did not enter A-24.
A Troop 4-7th Cavalry, Bradley (Bumper # A-31): This Bradley, one of four in the 3rd Platoon, was part of the lead element to go into battle. After a heavy machine gun bullet that struck its transmission disabled BFV A-36, its crew was ordered to abandon the vehicle. As they were exiting through the hatches, the Bradley was struck again by a shell that the crew believes was fired from a T-72. The round "exploded" against the side of the Bradley, in the words of one crewman, wounding several of the evacuating soldiers. Shortly afterwards, BFV A-31 pulled alongside and picked up its crew. Minutes later, two 120mm DU sabots[146] struck A-31 in the right hull under the turret, exiting the left hull behind the driver’s seat. Seven of the eight soldiers onboard were wounded, with some suffering severe burns and/or fragment wounds. During and after the battle, combat lifesavers were on the scene to extract the wounded from the damaged but still operable vehicle. Approximately 30 minutes after the battle had ended, the Platoon Sergeant and his observer, who had earlier gone into the two BFVs to help the wounded, returned to the scene and retrieved A-31, driving it back to their base camp.[147] All of the wounded survived, and the DU follow-up program in Baltimore is currently monitoring those with embedded fragments.
A Troop 4-7th Cavalry, Bradley (Bumper # A-22): This Bradley was the last vehicle hit by friendly fire in this battle. It was oriented east and the DU round[148]entered the left rear turret section and exited the right front turret. The gunner was killed, and three other soldiers (the commander and two dismount troops) received fragment wounds, including a Sergeant First Class (SFC) who was on top of the vehicle and was blown clear.[149] Two other soldiers entered the vehicle after it was hit to rescue the surviving crewmen. The BFV could still be driven, but was not combat-capable. Within hours of the incident, soldiers entered A-22 to salvage its radio, munitions, and other sensitive equipment, which were reused within the battalion. The SFC who was ejected from the vehicle has stated that it was common knowledge within the unit that A-22 had been struck by friendly fire; however, the SFC, at least, was unaware that DU munitions were involved. The SFC is currently enrolled in the Baltimore DU follow-up treatment program for soldiers exposed to DU.[150, 151]
Fifteen or more soldiers may have been exposed to DU dust since they were in these three Bradleys at the time the vehicles were struck by DU rounds. A Headquarters and Headquarters Troop (HHT) M113 medical ambulance evacuated the wounded soldiers to the Squadron Aid Station by at least three medics.[152] Additionally, an unknown number of soldiers may have been exposed when they entered the vehicles shortly after the vehicles were hit.
b. Task Force 1-37 Armor: Evening of February 26, 1991
At around 8:00 PM on February 26, Task Force 1-37 Armor conducted a night attack on an Iraqi position defended by portions of the Talwakana Division, Republican Guard, equipped with T-72 tanks and BMPs. The attack was part of a coordinated division attack, with 1-37 Armor being the southernmost task force. 1-37 Armor was connected with the 3rd Armored Division in 7th Corps’ attack in the south. One tank, bumper #B-23, was hit by a shaped charge weapon (most likely a Hellfire missile), causing an on-board fire. This incident is described in the section on tank fires. At the time of the attack, low, heavy clouds and rain obscured visibility. The following information is known about the tank (Bumper # C-12) hit by a DU round.
C Co., Task Force 1-37 Armor, Abrams Tank (Bumper # C-12): This tank was struck in the rear by a 120mm DU round[153] which caused a loss of power. As the crew was evacuating, an antitank (AT) missile struck the rear of the bustle rack, causing the rucksacks, duffel bags, and associated equipment fastened there to catch fire. There was no damage to the turret’s interior, and no secondary explosions of stored ammunition or fuel. No injuries were reported among the crewmembers, and the tank was recovered on March 4, 1991. The identities of the crewmembers are unknown at this time. It is assumed that the tank had its normal four-man crew.[154]
c. Battle of Norfolk: Early Morning Hours of February 27, 1991
The largest friendly fire incident of the war involved the soldiers of the 3rd Brigade of the 2nd Armored Division (Fwd) during a February 27, 1991 night attack on the 37th Brigade of the Iraqi 12th Armored Division. This 2nd AD brigade was brought in from Germany to form the 3rd Brigade of the 1st Infantry Division in Operation Desert Storm. The tank battle that ensued was a tumultuous, 360-degree action. Overcast skies and wind-driven rain and smoke compounded the confusion of the pre-dawn, swirling battlefield. The US combat vehicles were using thermal sights, making identification of friend or foe more challenging. The battle resulted in the damage or destruction of five Bradleys and five Abrams Tanks, with nine of the ten US vehicles hit directly by 120mm DU sabots fired from M1 tanks. In addition, several of these vehicles were also struck by enemy fire.[155]
The action began following the Battle of 73 Easting in which the 2nd Armored Cavalry Regiment (ACR) located and destroyed elements of the Iraqi 12th Armored Division and the Tawalkana Division. The 2nd ACR halted their advance and allowed the two brigades of the 1st Infantry Division (ID) to pass through their positions on the night of February 26th. Most units do not train in peacetime to do a night passage of lines (while firing live ammunition) because it is considered too hazardous. Despite the fact that many of the soldiers had had little or no sleep in the previous 36 hours, the passage of lines was performed flawlessly. Following the passage, the two brigades were attacking east as part of a division coordinated attack with the 1st Brigade in the north and the 3rd Brigade in the south. Since there were no obvious terrain features to separate the forces, the dividing line between brigade sectors was the 92 East/West grid line.
The Third Brigade attacked with three battalions on line to clear the zone of the enemy. Although the night was clear, with plenty of starlight to optimize the performance of night vision devices, the battlefield was far from ordered. In spite of its leaders’ best efforts, the battalions of the 3rd Brigade did not maintain a line-abreast formation. To further complicate matters, pockets of enemy infantry became interspersed among the attacking US combat vehicles. The shifting battlefield contributed greatly to the ensuing confusion. Two Bradleys of Bravo Company, Task Force 1-41 Infantry were the first to be engaged. Equipment problems forced the company commander to switch vehicles and the company momentarily lost contact with the rest of the battalion. In their effort to reestablish contact, Bravo Company entered an Iraqi bunker complex and was engaged by rocket propelled grenades (RPGs) at around 2:00 AM on February 27th. Following the initial RPG attacks, Bravo Company was fired on by US Abrams tanks. Here is what is known about the three Bradleys damaged in this action:
B Co. Task Force 1-41 Infantry, Bradley (Bumper # B-21): This Bradley was struck by two 120mm DU sabot rounds,[156] killing three soldiers and wounding at least three of the ten crewmen and infantry soldiers aboard. At least two of the wounded had embedded fragments; a third suffered severe burns in the incident.
B Co. Task Force 1-41 Infantry, Bradley (Bumper # B-26): This was the vehicle commandeered by the company commander after his Bradley malfunctioned. A 120mm sabot struck the Bradley,[157] killing one soldier. The crew from another BFV (#B-32) pulled up alongside B-26 and assisted its occupants in evacuating the vehicle. The same personnel also removed sensitive items of equipment from B-26. A Sergeant Major in B-32 who responded to the incident believes his exposure to DU was minimal, since he was only in the struck vehicle for a very short period of time.[158]
B Co. Task Force 1-41 Infantry, Bradley (Bumper # B-33): This Bradley was struck by a 120mm sabot round.[159] No soldiers were killed. It is unknown who, or how many, soldiers were onboard at the time it was struck, or the number and extent of injuries. Parts had been stripped from the vehicle after it was knocked out.
The numbers and identities of soldiers who entered the Bradleys to rescue fellow soldiers or for other reasons are currently unknown. Following the attack, the wounded were evacuated and soldiers with combat lifesaving certification rendered first aid. Their efforts were hampered by enemy mortar fire, which fortunately did not produce additional casualties.
Later that morning, between 4:00 AM and 5:00 AM, two Bradleys from Delta Company, Task Force 1-41 Infantry came under a combination of friendly and enemy fire. The Bradleys had become separated from the rest of the battalion, initially because one of the Bradleys was stuck in a revetment (three-sided earthworks or berms built by the Iraqis to shelter their armor while allowing them to engage hostile forces). Later, the unit halted when they encountered surrendering Iraqi troops. They were ordered to point the Iraqis in the right direction and catch up with the rest of the company. Some time later they were engaged by Iraqi rocket-propelled grenades (RPGs), and returned fire. This drew the attention of soldiers from the 1-34th Armor who thought they were drawing fire. After receiving authorization to fire, the tanks destroyed the two Bradleys. A subsequent plotting of their location indicated that the Bradleys were about 1 km into the 1st Brigade’s sector. A bunker complex with unfired RPGs was discovered approximately 300 meters to the front of the two Bradleys. The following is known about the two Bradleys damaged in this action:
D Co. Task Force 1-41 Infantry, Bradley (Bumper # D-21): After driving all night (until around 4:00 AM) this BFV, with at least seven occupants, drove into a bomb crater. In the process of extricating itself, D-21 became separated from the rest of the company. Shortly afterward, the BFV and its squad moved into a bunker area, where they rounded up about 20 Iraqi EPWs. At this point they were spotted and engaged by M1A1 tanks from another unit. D-21 was stuck in the side hull by three 120mm sabot rounds,[160] two of which passed through both sides of the vehicle and struck another BFV (D-26) parked 20 feet away. The driver of D-21 was killed; the other three soldiers still in the vehicle were wounded. The vehicle caught fire and was totally destroyed. A scout unit from the 1st Infantry Division that had also fired on the two BFVs, apparently without effect, realized its error and came to their aid, evacuating the wounded crewmen to a nearby medical aid station. No one attempted to remove anything from either D-21 or D-26, since the two BFVs were on fire when responding personnel arrived, and were too badly gutted to be salvageable. Several members of the crews or associated infantry fled into the desert after the second volley, fearing the vehicles would explode.[161]
D Co. Task Force 1-41 Infantry, Bradley (Bumper # D-26): This Bradley was struck by two 120mm sabot rounds[162] that had just passed through D-21, in the incident described above. The sole occupant of D-26, the driver, sustained severe leg wounds and other injuries from the projectiles. Seven other crewmen or "dismount infantry" (troops who ride the Bradley into the battle area, then "dismount" the vehicle to engage the enemy), had earlier left the BFV to secure enemy prisoners of war (EPWs) and to clear captured bunkers. The driver, though badly wounded, was able to get out of the vehicle on his own, and once outside was aided by fellow platoon members. After being struck, D-26 caught fire and "melted to the ground," in the words of its driver, making it unlikely that any troops would have entered it. Both D-21 and D-26 were left in place until after the ground war.[163]
The five tanks damaged or destroyed at the Battle of Norfolk were the last of the friendly fire victims to be engaged in this battle. These tanks, which were from 3-66 Armor, were attached to Task Force 1-41 for this mission. The first tank to be destroyed (B-66) was initially struck by an RPG. When an RPG strikes a tank, it produces a shower of flames and smoke. To soldiers viewing the event through thermal sights, it may appear as if the struck tank has fired in their direction. This may have been the case in this incident, because shortly after the RPG impact, B-66 came under fire from one or more tanks. Four additional tanks rushing to the aid of B-66 were subsequently fired on and struck as well. Here is what is known about the five Abrams tanks damaged in this action:
B Co. 3-66 Armor, Abrams (Bumper # B-66): This was the Bravo company commander’s tank. It was hit by three 120mm DU rounds[164] with one striking just below the turret, killing the gunner. None of these rounds penetrated the DU armor panels. At the time it was hit, it was moving in a different direction than the rest of the company. This may have contributed to the misidentification. Three soldiers survived this attack, at least two of them with severe burns. One of the survivors had fragment wounds as well.
B Co. 3-66 Armor, Abrams (Bumper # B-22): This tank, reacting to the fire that engaged B-66, turned in the direction of fire and was hit on the front slope by a 120mm DU round.[165] There was no internal damage to this tank.[166] The driver was wounded. It is presumed that this tank had its full crew of four at the time it was struck.
A Co. 3-66 Armor, Abrams (Bumper # A-14): This tank was struck by a 120mm sabot round fired from an Abrams tank.[167] Three soldiers were wounded. It is presumed that this tank had its full crew of four when it was struck.
A Co. 3-66 Armor, Abrams (Bumper # A-31): This tank was struck in the left rear by pieces of a 120mm DU round.[168]A report prepared by the Radiation Control (RADCON) Team from KKMC states that the four-crew members of this tank all received fragment wounds and were evacuated back to Germany. The Company Commander, who relayed this information to the team in late April 1991, also stated that numerous individuals were exposed to smoke during the resulting fire. One member of the RADCON Team advised the Company Commander that all individuals involved in the DU incident should receive an appropriate medical exam. The commander was given a copy of a health hazard message dated April 11, 1991 and a copy of TB522.[169]
A Co. 3-66 Armor, Abrams (Bumper # A-33): At approximately 4:30 AM on the morning of 27 February, A-33 was struck in the engine compartment by a TOW anti-tank guided missile probably fired from a Bradley Fighting Vehicle. The uninjured crew were evacuating their disabled tank when it was hit again, this time by two DU sabot rounds[170] that hit the vehicle in the left side and exited through its right side. The tank commander, driver, and gunner sustained injuries from fragments. The loader, who was already outside the tank, was apparently uninjured, but may have been at risk from inhaling DU aerosols created on impact. At least one of the individuals involved in this incident is enrolled in the VA’s DU Follow Up Program.[171]
In summary, a total of 50 soldiers were exposed to DU fragment wounds and DU aerosols inhaled or ingested during the Battle of Norfolk. Additionally, an unknown number of soldiers could have been exposed to DU residues when they entered the vehicles shortly after the damage occurred.
d. Battle for Jalibah Southeast Airfield: Around 6:00 AM, February 27, 1991
On February 27th the 2nd Brigade of the 24th Infantry Division was attacking the heavily defended Jalibah Airfield, the last major obstacle between the 24th Infantry Division and the Euphrates River. Satellite imagery and reconnaissance aircraft indicated the presence of 20 enemy tanks and more than 1,000 dug-in Iraqi soldiers. Task Forces 1-64 Armor and 3-69 Armor were to "overwatch" (provide covering fire) from the southwest and southeast corners of the airfield respectively. A north-south road was to be the boundary between the two overwatching forces. Meanwhile, Task Force 3-15 Infantry was to sweep the airfield from west to east.
As the two overwatching task forces were moving into position, a platoon from the 3-69 Armor crossed to the west of the boundary road. At this point, Company C of 3-69 Armor came under direct and indirect fire from the Iraqis at the airfield. As the C Company tanks moved in on what they thought was an Iraqi defensive belt, Bradley vehicles from Task Force 1-15 Infantry appeared about 2,000 to 2,500 meters in front of them. The C Company tanks mistook the Bradleys for Iraqi armored vehicles and engaged them with eight to sixteen 120mm armored piercing (DU) rounds. The following is what is known about these Bradleys:[172]
C Co. 3-15 Infantry, Bradley (Bumper # C-11): In the early morning hours of February 27, BFV C-11 was on the right flank of a four-company task force formation closing in on Jalibah Southeast Airfield in southern Iraq. After changing direction to evade incoming enemy artillery, C-11 was hit from behind by a 120mm DU sabot round fired from an Abrams tank.[173] The round entered the Bradley through the ramp, passed through the troop compartment, and exited the left side of the vehicle. An antitank weapon (AT4) stowed inside the Bradley detonated, inflicting severe injuries to several personnel in addition to the wounds produced by DU fragments and shrapnel. A PFC was killed and at least five of the remaining seven personnel were injured, most seriously. Two NCOs aboard the stricken vehicle provided emergency first aid, then drove the damaged Bradley filled with wounded soldiers for about three miles to a medical aid station. They removed salvageable equipment from the shot-up BFV, then drove the still-serviceable vehicle back to their company’s forward operating location. While en route they picked up two other soldiers from another disabled combat vehicle. The two NCOs continued to man C-11 for another three days before it was taken away from them and sent back to KKMC with other DU-contaminated systems.[174]
C Co. 3-15 Infantry, Bradley (Bumper # C-22): This Bradley was struck on the right side, just below the turret, by a 120mm sabot round.[175] The round exited the vehicle on the front left side after passing through the driver’s compartment, killing the driver. Only one other soldier on this vehicle has been identified to date.
C Co. 3-15 Infantry, Bradley (Bumper # C-23): Two 120mm sabot rounds entered the vehicle[176] on the right side and crossed through the engine compartment, exiting on either side of the driver. Nine soldiers were probably in this Bradley, three of whom—all wounded—have been identified.
There could have been as many as 25 soldiers onboard the three Bradleys at the time they were struck at Jalibah. The number of soldiers who entered the contaminated vehicles to rescue fallen comrades is unknown at this time.
e. 4-66th Armor: Around 4:30 PM, February 27, 1991
On February 27th the scout platoon of 4-66th Armor was ordered to provide flank security and maintain contact with elements of 1-35th Armor on the battalion’s left flank. The unit was attacking an Iraqi ammunition storage area. Light rain and dense smoke from a nearby burning ammunition dump obscured the visibility. The operation went smoothly until around 4:30 PM, when the advance of 1-35th Armor stalled, leaving the flanks of 4-66th Armor exposed. Within minutes, Bradleys from the scout platoon came under fire from dug-in Iraqi rocket propelled grenade teams. During the ensuing fight, two of the scout platoon’s Bradleys were struck by DU rounds. The following is known about these Bradleys:
HQ Co. 4-66th Armor, Bradley (Bumper # HQ-55): This Bradley was hit by a 120mm DU sabot round on the lower right side, just above the road wheel.[177] All five soldiers onboard evacuated without injury and have been identified.
HQ Co. 4-66th Armor, Bradley (Bumper # HQ-54): This was the scout Platoon Sergeant’s Bradley. To cover the evacuation of HQ-55, the Platoon Sergeant placed his track between the damaged Bradley and the enemy. He had just opened fire on the Iraqis when two DU rounds struck his Bradley, killing his driver and wounding the commander and gunner.[178]
1-34th Armor
Just after midnight on February 27, the 1-34 Armor Battalion of the 1st Brigade, 1st Infantry Division, was doing a night passage of lines through the US 2nd Armored Cavalry Regiment. The 2nd ACR had been engaging the Republican Guard Tawalkana Division. An Abrams mistook the Bradley, which was stationary at the time, for an Iraqi combat vehicle and fired a single round from about 1,500 meters. The DU sabot went in the Bradley’s left rear door on a centerline trajectory. The hit set off TOW missiles, 25mm rounds, and other munitions stored in HQ-232’s interior. The blast ejected the driver and gunner through their respective hatches, which were open. They were extremely fortunate, escaping with only minor flash burns. The commander also escaped without injury. Two observers in the rear of the vehicle were wounded. One lost his heel (probably to the DU round itself, not the secondary explosion); the other suffered a serious leg injury. HQ-232 was completely destroyed. Another Bradley, HQ-231, was hit by a 25mm (non-DU) round while moving forward to assist HQ-232. Other than the surviving crewmembers of HQ-232, no other personnel entered the vehicle.[179, 180]
g. 2nd Squadron of the Second Cavalry Regiment
A friendly fire incident involving Bradley bumper # G-14 occurred on 27 February 1991. At approximately 4:00 PM local time a shell, type or source unknown, struck G-14 in the left rear. The round struck and penetrated the turret, killing the gunner. The four other crewmembers received only minor injuries, and were returned to duty later that evening. The round passed through the turret without igniting any secondary explosions or fires. Later, at approximately 10:00 PM, an M1A1 that was part of a US armored unit coming forward to relieve G Troop was apparently startled by the sudden appearance of G-14, and fired a 120mm DU round into the empty vehicle from an estimated range of 50 meters. The shell set off an onboard fire that completely destroyed G-14. The BFV melted, making it difficult to determine the number and type of shells that struck it, although at least one was assessed as DU by the BDAT team. Corroborating information is still being sought by this office.[181, 182]
Air-to-Ground Incidents
On January 22, 1991, US Air Force A-10 "Warthog" close air support aircraft mistakenly strafed the abandoned town of Hamel Pyat, just inside the Saudi border opposite southern Kuwait, while a patrol from the Marine 1st Force Reconnaissance Company was stopped at the location. The errant attack did not cause any casualties, since the 12-15 Marines who witnessed the incident were on the opposite end of the empty town. The A-10 involved in the incident made a single short strafing run from a very high altitude. Because of the threat from Iraqi surface-to-air missiles, A-10s had been ordered to stay at least 8,000 feet above ground level. The A-10 is most effective at lower altitudes, and the great firing distance caused a wide dispersion of the 30mm rounds. Although the cyclic (firing) rate of the A-10’s Gatling gun is extremely high (6,000 rounds per minute), it typically fires a two-to-three second burst, meaning 200-300 shells might have impacted the target area. One shell in five is a non-DU tracer round. Fortunately, none of the Marines were close enough to the impacting DU rounds to be wounded or potentially exposed.[183]
On January 23, 1991, an A-10 inadvertently strafed a Marine observation post, also manned by 1st Marine Force Recon personnel, near the border town of Khafji, Saudi Arabia, abutting the eastern tip of Southern Kuwait. No casualties resulted. The squad-sized team had set up a forward observation post, OP 8, to gather intelligence and targeting information on Iraqi forces across the border. OP 8 consisted of a reveted HUMVEE configured as a reconnaissance vehicle dug into a sand dune, manned by a squad of Marines and a smaller number of Navy SEALs. At dusk, the Marine forward air controller at OP 8 spotted an Iraqi artillery position two kilometers to his front, and requested an orbiting A-10 on an "armed reconnaissance" mission to attack the enemy position. The A-10 pilot misidentified OP 8 as his target, and fired a single burst of 30mm DU shells that impacted in and around the post. No Marines were injured in the incident, and no vehicles or equipment were struck. The soft surface, wide dispersion of the shells, and the distance from which they were fired would have reduced the likelihood of an aerosol-forming impact. The Marines remained at the site for at another day or so, but did not disturb the buried or exposed DU projectiles.[184]
A more serious incident, once again involving the Force Recon Company, occurred on January 24, 1991. A pair of A-10s working a "kill box" just over the Kuwaiti border targeted a Marine platoon that was driving east along a road that parallels a man-made anti-smuggling sand berm that runs the length of the southern Saudi-Kuwait border. At the time of the attack, the Marines were about 30 kilometers west of Khafji, Saudi Arabia, which had recently been the scene of the first large-scale ground clash between Coalition and Iraqi forces. The convoy, consisting of three five-ton trucks and a pair of HUMVEEs, was two kilometers inside the Saudi border, south of the Fire Support Coordination Line (FSCL) intended to protect forward US and Coalition forces from friendly air, ground, and naval firepower. Despite the fact that the vehicles were south of the berm delineating the FSCL, and that the noontime skies were bright and clear, the pair of A-10s made four strafing passes from an altitude of about 4,000 feet. While the first two passes missed by a wide margin, the third and fourth strafing runs knocked the wheel off a HUMVEE, peppered other vehicles with fragments, and caused two casualties.
A Marine corporal had a small shard of aluminum, apparently from the metal jacket of a 30mm DU projectile, puncture his forearm, while a Navy Chief serving as a corpsman had a very small metal fragment lodged in his wrist. In both cases, the fragments were completely removed. When the unit returned to the United States in May 1991, the medic who had treated both casualties referred the Navy Chief to a special Radiation Physical to verify that he had not been exposed to DU or was not carrying any residual DU.[185] Contacted for this investigation, the Chief (now retired) said that he had not undergone a Radiation Physical, but the fragment had been removed the day after the incident. A series of X-rays a year later (when he was getting a MRI examination) did not reveal any embedded fragments.[186]
Ship-to-Ship Incident
A ship-to-ship friendly fire incident involving the USS Jarrett (FFG-33) and the USS Missouri took place on February 25, 1991. Three US Navy warships and one UK Royal Navy warship (HMS Gloucester) were shelling Iraqi-occupied Faylakah Island. An incoming Silkworm anti-ship missile fired from a shore-based Iraqi missile launcher was destroyed by a Seadart missile fired from HMS Gloucester. During the engagement sequence, the USS Missouri fired off one or more chaff bundles (a standard countermeasure against radar-guided missiles). The Phalanx Close In Weapons System (CIWS) on the USS Jarrett, which was 2-3 miles off the Missouri’s port side, experienced an anomaly that caused the system, which was operating in the "automatic engagement" mode, to fire a quick burst at the chaff. The former Executive Officer (XO) aboard the USS Missouri estimated that four of the 20mm rounds, which have not been confirmed as DU, struck the ship in the bulkhead above the famed "surrender deck" where the Imperial Japanese government had capitulated in 1945. All but one of the rounds bounced off the bulkhead, leaving dents, since their energy was mostly spent. One round penetrated the thin upper metal of the bulkhead and passed through a guest berth on the ship. No casualties resulted, and to the best of the XO’s recollection, the round was not recovered and probably fell into the sea.[187, 188]
In summary, the total number of friendly fire exposures could involve numerous soldiers, including those who may have entered the contaminated systems soon after they were disabled by DU munitions. Based on standard manning configurations, we estimate that 113 soldiers were aboard the fifteen Bradleys and six Abrams at the time they were struck by DU munitions (see Table 6).
All of the DU friendly fire incidents reported from the Gulf War involved US systems firing on other US systems. No Coalition troops or equipment were targeted or struck by DU rounds fired from US or UK weapons.
| First Page | Prev Page | Next
Page |